How To Choose The Right Tensile Testing Machine?
April 22, 2022
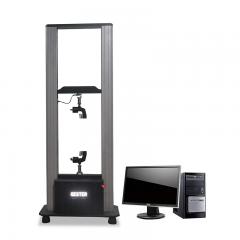
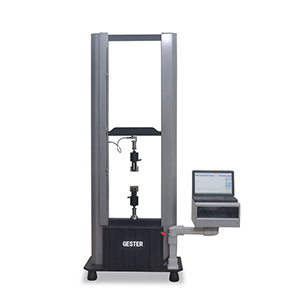
Universal tensile testing machine, as the name implies, is a testing equipment that can perform various tests on various materials. It is widely used in various industries, so what should be paid attention to when purchasing? 1. Test stroke space The stroke is about 600-1500mm, which is enough for general customers. The maximum stroke space of the GESTER Universal Tensile Strength Tester can reach 1500mm. If the customer has requirements for the stroke space, can be customized. 2. Force Accuracy Accuracy includes force accuracy, velocity accuracy, deformation accuracy, and displacement accuracy. For general manufacturers, 1% accuracy is enough. The accuracy of the GESTER fabric strength testing machine can be up to plus or minus 0.5. 3. Main configuration Drive, lead screw drive and rack drive. Lead screw drive is expensive, used for high precision, high test repeatability; Rack drive, for low precision, low test repeatability. The lead screw plays a decisive role in the measurement of tensile force accuracy. There are ball screws, trapezoidal screws, and general screws. Among them, the ball screw has the highest accuracy, and its performance can only be exerted by the operation of the computer servo system. The accuracy of the general lead screw and trapezoidal lead screw is not so high. GESTER tensile test using universal testing machine adopts Servo motor drive, synchronous wheel and precision ball screw drive, which has high precision and high test repeatability. 4. Output results The output results of the test results can be arbitrarily set: maximum force value, elongation, tensile strength, fixed elongation, fixed elongation force value, yield strength, elastic modulus, maximum test force 8 items. GESTER tensile strength testing machine can test all eight. 5. Experimental projects Tensile machine is required to be multi-purpose, that is, equipped with different materials, can be used for tensile, compression, bending, tearing, shearing, peeling and other tests. GESTER Universal Testing Machine is designed for conduct tensile, compression, bending, shearing, bonding strength, peeling, tearing and other tests 6. Standard configuration problems Intelligent three basic configuration: host, microcomputer, and printer, if the microcomputer function is strong can directly print. It can also be equipped with ordinary computers. With computers, sophisticated data analysis can be performed, such as data editing, local magnification, adjustable report forms, and group-style statistical analysis. GESTER tensile testing machine has this function. 7. Test speed Some equipment in the market is 10~500mm/min, and some are 0.001~500mm/min. The former generally uses ordinary speed control system, which has low cost and roughness affects accuracy; the latter uses servo system, which is expensive and high precision. Speed control range of GESTER computerized universal testing machine: 0.001-500mm/min or 0.001-1000mm/min (optional). 8. Tension range The di...
View More


 English